
You've got your Aeronaut 30 or Aeronaut 45, Aeronaut Internal Frame and/or* Aeronaut Padded Hip Belt. Nice. Now, how do you put it all together? Read on for instructions.
Just need to read how to install the Padded Hip Belt? Click here.
Want help? emailus@tombihn.com
*Some folks will use both the Internal Frame and the Padded Hip Belt, while others may use just one or the other. For more on the pros and cons of each option, see our Aeronaut FAQ.

Installing the Aeronaut Internal Frame
First of all, determine which era of Aeronaut you have:
2017—Current Aeronauts
The Aeronaut internal frame slips inside the same zippered pocket that accommodates the shoulder straps, and is held in place by its hourglass shape. First, orient the frame so the “TOM BIHN” label is at the top, facing away from the wearer and towards the inside of the bag: you want the aluminum stay facing away from your back, not towards it. Insert the frame behind the foam back pad (so the pad is still closest to you as you wear the pack). See below for photos that show how this works.
2014-2017 Aeronauts
Though there is no dedicated pocket, you can still utilize the internal frame in this era of Aeronaut: with the frame in the same orientation as described above, simply slide the internal frame into the pocket where you tuck the shoulder straps.
Pre-2014 Aeronaut 45*
Aeronaut 45s made before 2014 have a slightly shorter back compartment. To determine if you have an Pre-2014 Aeronaut, zip it open and look at the dividers in the main compartment -- if the dividers are secured with snaps, you have a Pre-2014 Aeronaut. If your Aeronaut has snaps, order the Aeronaut 30 Internal Frame. Installation is the same as for pre-2017 Aeronauts above. This does not apply to the Aeronaut 30 because the Aeronaut 30 debuted in 2014. So if you think you have an Aeronaut 30 made before 2014... you need to lay off the hallucinogens, ‘cause that’s just wrong. And if your Aeronaut 45 dividers are secured with zippers, you have a 2014-2017 Aeronaut.
*Let us take a moment to share that it delights us to no end that so many pre-2014 Aeronauts—many of which are 7+ years old—are still in use. This is the stuff of dreams for us as designers and manufacturers: we seem to have built a bag that endures.

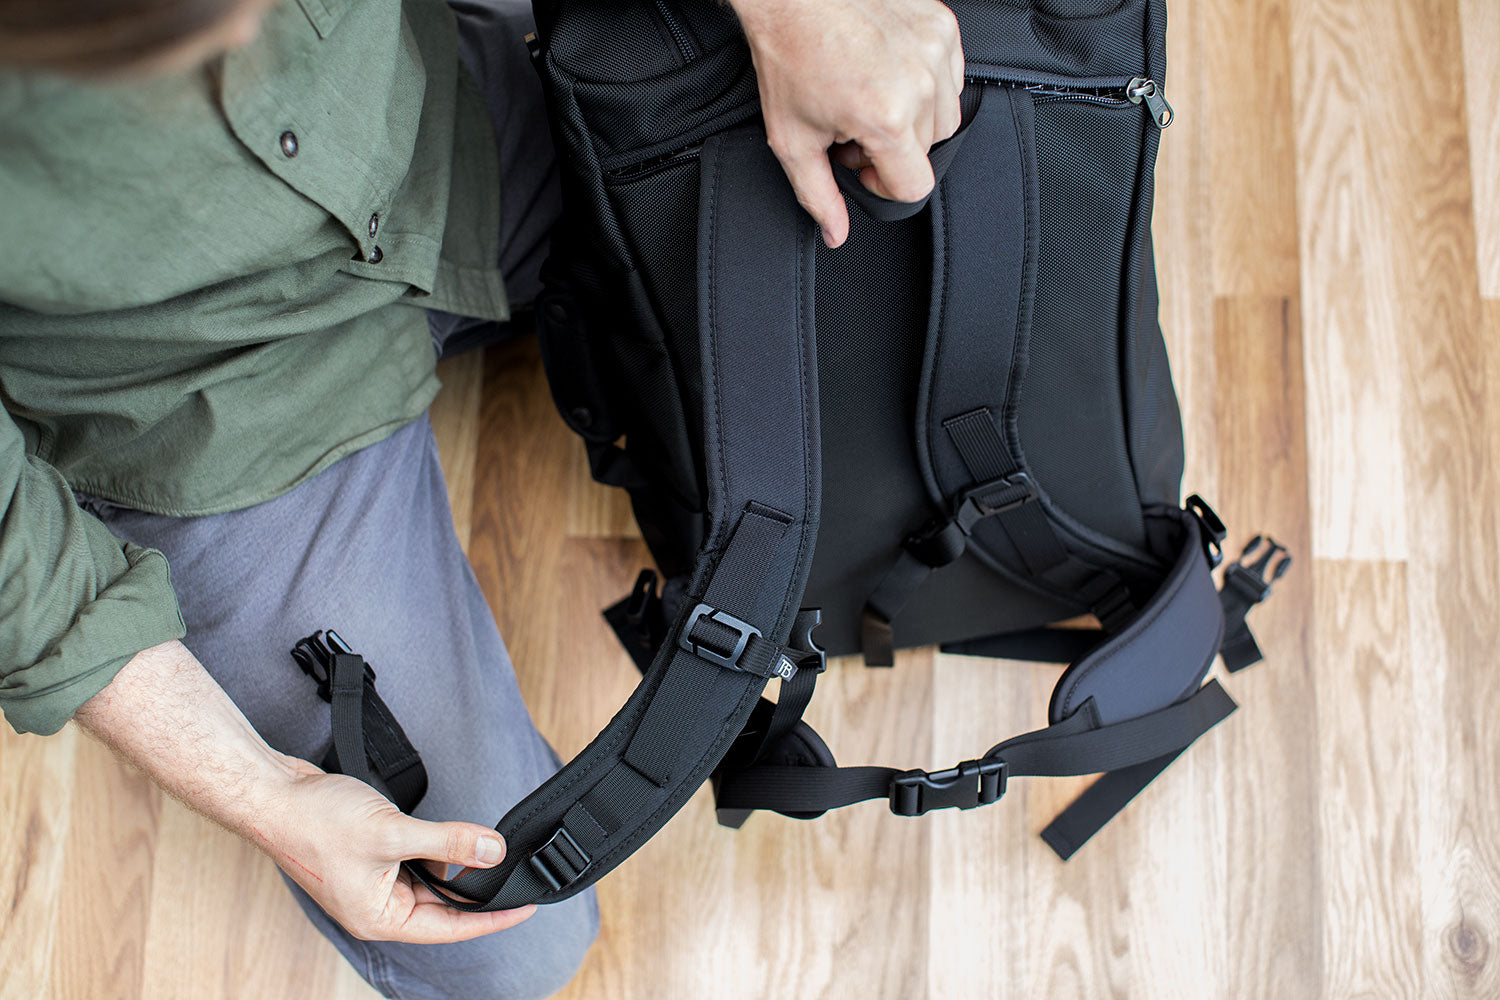
These photos demonstrate how to install the Aeronaut Internal Frame in a 2017/current-era Aeronaut. First: flip the backpack straps over the front of the bag and zip open the "secret" pocket in the back that contains the back foam.

Slide the Internal Frame in with the label facing away from you: this ensures the pre-set generic spinal curve is in its appropriate orientation. The foam back panel of the Aeronaut should be against your back and the Internal Frame in front of that foam. Apparently, according to this photo, one also needs to lift one's pinky while installing the Internal Frame—like at a fancy tea party.

Make sure to tuck the Internal Frame in under the top of the secret zippered pocket.

It's in there! Again, make sure the label is facing away from you, as shown in the photo.

Zip the secret pocket closed. Don't force the zipper shut—it's not one of the burly exterior zippers.
Most people will find the pre-determined generic spinal curve of the Aeronaut Internal Frame to be plenty comfortable. If you'd like to adjust the curve, see these video instructions for The Guide's Pack Internal Frame—the same technique applies to the adjustment of the curve of the Aeronaut Internal Frame.
These instructions apply to all eras of Aeronaut 45 and Aeronaut 30.

Gather the ingredients: an Aeronaut (in this case, an Aeronaut 30) and an Aeronaut Padded Hip Belt.

If the backpack straps on your Aeronaut are clipped in, you can go ahead and unclip them now.

Clip in one side of the Aeronaut Padded Hip Belt. Important, and difficult to show in the photo: make sure the side wing of the Aeronaut Padded Hip Belt is tucked into the space where the "innie" buckle lives. This will ensure your experience of the Aeronaut Padded Hip Belt is a seamless one—almost as if it's sewn in, but without the inconveniences of a sewn-in hip belt.

Voila! One side is done. Celebrate with a Vulcan salute.

Here's how it looks from the other side once it's clipped in.

Let's clip in the other side of the Padded Hip Belt now.

Nice job.

Looking comfy.
Now, how do we clip in the backpack straps of the Aeronaut?

You see, there's a clip on the Aeronaut Padded Hip Belt for them...

That's how we made it possible for the Aeronaut Padded Hip Belt to ride as low as it does, making it an option for a wider variety of people.

Ready to go.

Special thanks to our photo assistant Ichiro (Lab/Husky/Who-Knows-What mix).


AB - September 25, 2023
In the old version, it looks like the metal stay is the entire length of the frame. In the version I just received, the stay is only half-length. In addition, there is no label. How should my version be installed? Metal stay against the lower back or between the shoulders? Stay sleeve towards the bag?